12 Household Organizing Ideas for the Holiday Season

Published on December 8, 2020 by Alison Bentley on Redfin.

The holiday season is in full swing, which means decorating your home with lights and ornaments galore. But with all this winter cheer and seasonal décor, you might be struggling to keep your home organized. Don’t worry, we’ve consulted with organizing experts across the country and they’ve revealed their best household organizing ideas for the holiday season. So whether you’re living in sunny Sacramento, CA or chilly Philadelphia, PA you’ll want to know how to keep all your holiday items organized this December and for many years to come. 

1) Set intentions on what decorations are most meaningful and spark joy for you.Ask yourself – do I want to store these decorations year-round? Do they take up valuable space in my home? Would I rather rent or borrow decorations to limit the number I own? Remember, the less stuff we display, the more meaning we find in each piece. – Dr. Jessica Louie, Host of The Burnout Doctor Podcast & Master-Level Certified KonMari Consultant 

2) Let go of any holiday decorations that no longer spark joy. By making intentional choices about which holiday decorations you keep and display, you let the decorations that you really love shine. As you are putting away decorations, ask yourself, will I be happy to see this again next holiday season? Write a “note to self” and tuck it away in your decorations as you pack up for the season. The note could include highlights of the season and suggestions for next year. – Megan Spillman, Peace and Tidy

3) Reuse what you have and make sure to label. When packing away holiday décor, save the used, ripped tissue from gift-giving to wrap and protect fragile items. When packing multiple bins or boxes you’ll use, be specific: label “Mantle & Staircase” or “Blue & Silver Décor” instead of “Hanukkah.” When putting all the décor away, if there’s anything that didn’t make it out this season, consider donating it if it no longer fits your aesthetic. – Amy Trager, CPO® 

4) Clean out your storage closet for the season. The winter season is a great time to declutter and organize your storage closet(s). Sorting light bulbs, batteries, and Command hooks into separate clear bins and adding labels, help make holiday decorating a breeze and put away a cinch too! You may also consider moving these items down to a convenient shelf (at least temporarily) for easy access during the winter. – Melissa Rogers, Modified by Melissa

5) Decide what to donate before decorating. Before you bring gifts into the house, set a timer for 15 minutes, put on fun holiday music and skim the house for things you can donate. Thrift stores need items at the holidays and now more than ever that’s where people are shopping. Reduce reuse recycle. The kids can get involved, too! Make it fun by letting them know other families will love their hand me downs. – Amy Fritz, Thoughtful Organizing

6) Donate items you no longer display. For much of the year, your winter holiday decorations are out of sight and out of mind. When you’re getting out your festive décor for the holiday season, that’s a perfect time to let go of items you no longer display. Not only will this leave you feeling lighter, but by donating your excess decorations before rather than after the holidays, you could help make someone else’s celebration a little brighter this year. – Kammy Lee, Organized by Kammy

7) Store ornaments by shape and size. When storing tree ornaments, keep similar sizes/shapes together! Keep flat ornaments separate from balls and round ornaments, as it is more space-efficient and they will fit better in boxes. Wrap any delicate ornaments in tissue to avoid damage. – Adeilah Dahlke, Jigsaw Organizing Solutions

8) Reuse boxes to store your ornaments. Save money by using wine boxes from a local liquor store to preserve holiday ornaments. The dividers keep ornaments from breaking, and even heavy ornaments are safe in these sturdy boxes. – Barbara Reich, Life Organized

9) Plan for next year. Declutter your holiday décor as you are returning it to storage bins, purging the items that year after year don’t make the cut. While it’s easier to ball up the lights and toss them in a box, wrap them around a piece of cardboard or invest in a light storage reel to make future setup a breeze. – Azure MacCannell, Live Composed

10) Clean your holiday items as you store them. Dust and clean all holiday items as you put them away. As you excitedly open the boxes next year you are all good to go and don’t have any housekeeping to do. Just decorate for your holidays and enjoy! – June Carter, GYST* Solutions

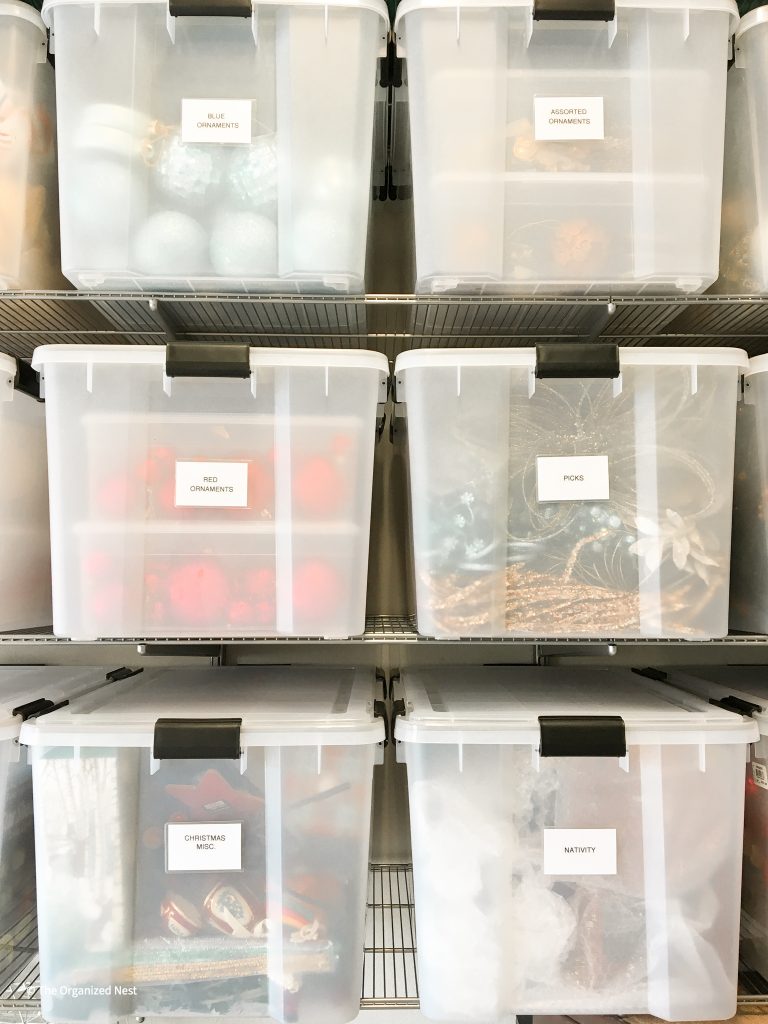
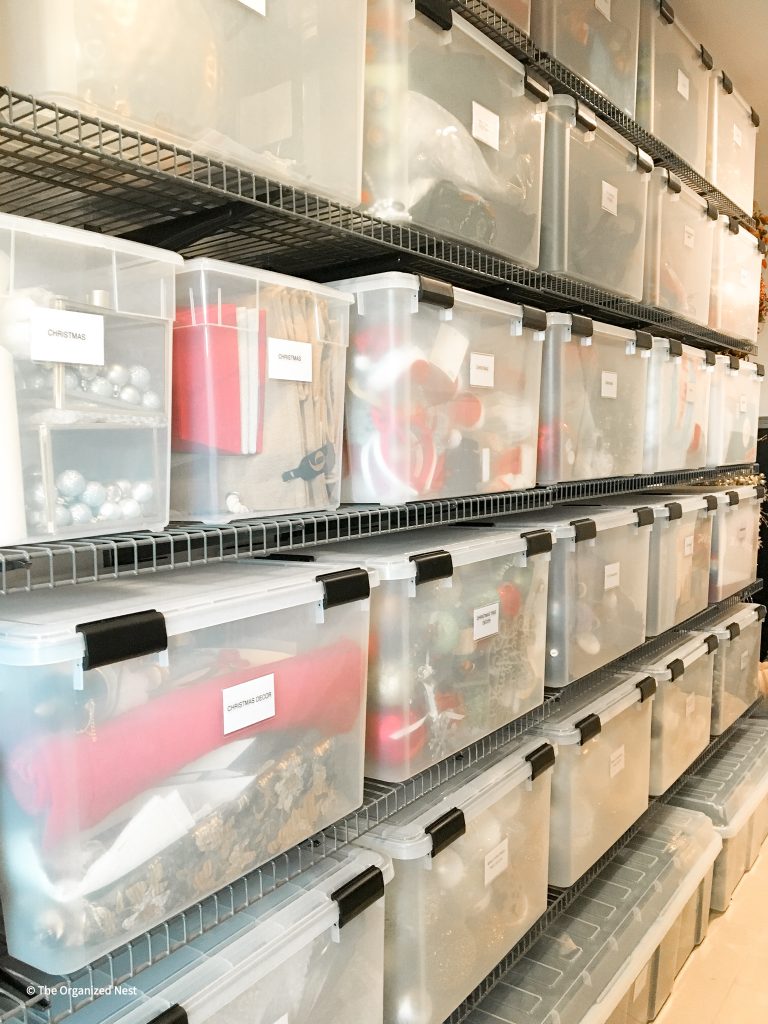
11) Store seasonal décor so you can see it. Keep all seasonal decorations in clear bins (not orange for Halloween or red for Christmas!) When everything is in a clear bin, you can see what’s inside and then label the outside!  Make sure to get rid of anything you don’t use this year, so that you don’t accumulate clutter. – Whitney Tevis, The Organized Nest, LLC

12) Make storage a breeze. We are all getting ready for the winter holidays pulling out decorations and clothing we have not used since last year. We recommend using clear containers is a great way to go for storage. Searching through the attic space or garage can become less of a chore if you can see what was packed a year ago. We also suggest when packing up the use of dry packs of Silica Gel which will absorb the moisture to keep the damp and musty smells from your keepsakes for the following year. – Kathleen Dahan, Uncluttered Places

Organizing Kids’ Artwork

Parents, we cherish each piece of art our child creates. But, let’s face it. Kids’ art output can be overwhelming! You likely have stacks and stacks of coloring book pages, drawings, popsicle stick ornaments, and other crafts sitting around your house. If you are limited in space, this can be a real issue for you. Even if you have a lot of space, my guess is that storing and saving art has you stumped.

A frequently asked question by many of our clients is “Where do I keep my child’s art?” 

Organization can bring an array of emotions but that is even more true where our child is concerned. Parents can feel tremendous guilt tossing their child’s artwork into the trash. So, what do you do? Here are a few of our top recommendations:

1. Use an Art App like Artkive, Keepy or Plumprint. My personal favorite is Artkive (www.artkiveapp.com). They send you a box and a prepaid UPS label and you fill it with your child’s artwork. Then, Artkive professionally photographs each piece and uploads it to your account. You can view and share your pictures anytime on any device. They also give you the option to return the artwork. This was great because I was able to pick a few of the special items I wanted to keep! 

2. Turn Your Art into a Photo Album. There are several ways to do this. My two favorite companies are Shutterfly and Artkive. Shutterfly is the more affordable option. Depending on their size and number of pages, the books range from $15 to $185. They start at 20 pages with a maximum of 100 pages. Artkive is the more expensive option. Their books range from $75 to $300, depending on how much art you send. But, they professionally photograph the artwork, which is included in the price. Each book holds between 20 and 200 images of art. Below are pictures of my daughter’s book from last year.

3. Create an Art portfolio. You can do this just like you were putting together a scrapbook or photo album. First, collect, label and date your kids’ art. Next, create a design layout on each page. Then, fill the book and label once finished. Craft stores like Hobby Lobby and Michaels offer a variety of sizes at affordable prices. My favorite brand is Itoya (pictured below).  

4. Display your child’s artwork. You have several options to accomplish this. First, you can create a simple rotating gallery using twine and clothespins. It makes it easy for kids to hang their art on their own. Second, you can create clipboards with old picture frames. Glue metal clips to the top center of each frame and attach to the wall. Third, you can have a collage made. This is a significantly bigger investment but it is a professional piece of art you can keep for many years. Designers like Jan Eleni Lemonedes will archive your child’s artwork and make a collage with smaller images of the art (see below). Prices start at $950 for the 40-image archival print. The standard sizes are 40, 70, or 112 image versions.

5. Store Art in a Large Container. This is not ideal, but many of our clients do not have the time to invest and just want a manageable storage system. Make sure you first collect, sort, and label the artwork. Each child should have his or her own container. I would recommend a weathertight bin that is large enough to accommodate oversized paintings and 3D pieces. My favorite is the Our Clear Storage Boxes from Container Store. (https://www.containerstore.com/s/our-clear-storage-boxes). I use these during the year as a temporary place for incoming art. Then, at the end of the year, I take some time to determine which items I can toss and which ones are archive-worthy. 

Bottom line. We understand organizing your kid’s artwork can be a challenge. The most important thing is to have a system in place. Hopefully, these recommendations gave you a good place to start!

-Emily

Virtual Consults

I’ve always organized and loved using different containers and organizing products.  I get more excited about walking into the Container Store than Neiman Marcus.  It wasn’t until I started working for the Organized Nest that I learned the value of researching and choosing the right product for every area.  The right product makes a huge difference not only on the appearance of the project, but also the functionality.  A huge benefit of hiring a professional organizer is taping into their knowledge of the different products on the market and what will work best for your area.  I have clients tell me all the time that they like to organize, but can’t seem to finish a project because they become overwhelmed with all the products out there.  This strange time of social distancing and sheltering in place has given many of us the time to tackle some of our organizing projects that have been put on the back burner.  It’s a great time for clients to use organizers to come up with an organizational plan and specific products for different projects.  This can easily be done through a virtual consult where we can help you with design, product choices and then you can execute the plan in your home.

-Mikell

Starting Small

Since we are all stuck indoors for the foreseeable future, most people are finding that we need projects to stay sane. This tiny semblance of control allows many of us to remain calm in the midst of the constant unknowns. 


Choosing a few small spaces in your home to cull through is a great place to start. Typically when a client hires us, it’s because they have large areas that needs an entire overhaul. Kitchens, garages, master closets…these spaces generally take a good amount of time to go through, and we help our clients come up with a better system for each individual.  

But right now, you can tackle spaces like junk drawers, coat closets, and kids art supplies just to name a few. We often tell our clients to start with the one place that brings them the most stress. Maybe its the mail, the laundry room closet, or your bathroom cabinet. Pick ONE area. Start small. Make the goal attainable for YOU. Now is the perfect time to set aside 30 minutes and get rid of unnecessary clutter. This is a great way to improve your current situation and will make tackling the next space seem attainable. 


A few easy rules of thumb: Sort items and group like items together. Go through mail and immediately recycle anything you don’t need. Move as many bills to online payments to reduce paper coming in to your home. When cleaning out drawers in your kitchen or bathroom, donate items that you no longer use. 


Remember, we are all in this together!! And we cannot wait to get back out there doing what we love most.

How to be an Organized Traveler

Picture this: you are about to leave for a highly anticipated (and much needed) vacation. You have picked out the perfect hotel, all the places you want to eat, and the most Instagram-worthy photo op. The only thing you haven’t done? PACK FOR SAID TRIP. Packing can be daunting, especially if you want to pack efficiently and in an organized fashion.

Lucky for you, we’ve come up with a few tips for making your next getaway go off without a hitch!

-Check out the weather, and plan accordingly. If you have to bring a heavy sweater, or other bulky items, try wearing them on the plane or in the car. That way, you aren’t taking up precious space in your bag.

-Stick with a color palette. Choose a neutral (black, white or denim) for your bottoms, and pack tops that coordinate with these colors. Better yet, go monochromatic for a few days during your vacation. It’s chic, effortless, and allows you to play with accessories like scarves and jewelry.

-Roll it up! Rolling your clothes is a great way to maximize space. Several companies offer packing cubes, which is also helpful. You can roll each item, and place inside the cube. This helps your garments stay wrinkle free and organized.

-Keep shoes to a minimum. Shoes take up a lot of space, and you can almost always get away with packing three pair of shoes, regardless of how long you are away. My personal favorites are: a tennis shoe (find one that you can workout in as well as throw on for sightseeing), a dressy open toe wedge or heel, and a ballet flat in a neutral color.

How easy is this? Packing should be the least of your concerns! Vacations are meant to be fun, not stressful. Stick with these hints and enjoy your next adventure!

Products we Love!

Copyright © 2024 The Organized Nest. All Rights Reserved.

3511 W. Biddison Street, Fort Worth, TX 76109